Revenue Grid Widgets: Personalized Per-User Setup and Admin User Setup
3 min read
This article is an addition to the main RG Email Sidebar Widgets setup article. It describes two special configuration scenarios:
- Widgets installation on personalized per user basis, used instead of installing the same set for everyone
- Widgets setup for a Salesforce Admin user
Individualized Widgets Setup on Per-User Basis
RG Email Sidebar widgets that can be added to Salesforce interface:
To Configure RG Email Sidebar Widgets in Salesforce
The prerequisite for configuring RG Email Sidebar Widgets for a Salesforce user account is to install Revenue Grid managed package for the Salesforce Org. Follow the instructions in this article to configure the prerequisites.
After My Domain was configured and RG managed package was set up, proceed to Salesforce configuration steps below.
Tip
Please perform the following steps most accurately, since a mistake here is likely to result in misconfiguration errors
1. Set up tenant URLs
For setting up tenant URLs, the Salesforce Admin needs RevenueGridTenantUrl and ServerSyncTenantUrl. To generate RevenueGridTenantUrl and ServerSyncTenantUrl required for RG Managed Package configuration, you can either contact our Support team or follow the instructions provided in the section below.
Important
Depending on your license, the appearance of your Sync Settings page may be different. Below you can find instructions on how to generate tenant URLs on the New and Legacy Sync Settings pages. Proceed with the steps according to the appearance of your Sync Setting page:
Generate tenant URLs on the new Sync Settings page
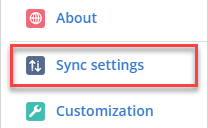
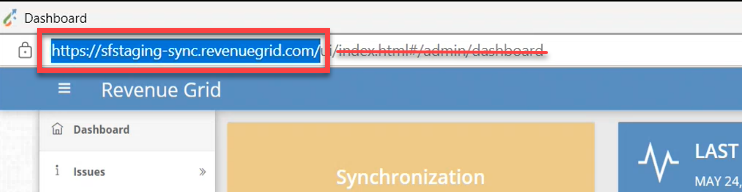
- Open RG Email Sidebar, click the ☰ Menu button, go to Sync settings
- Next, the Revenue Grid Sync Settings page will open. Find the address bar at the top of the page
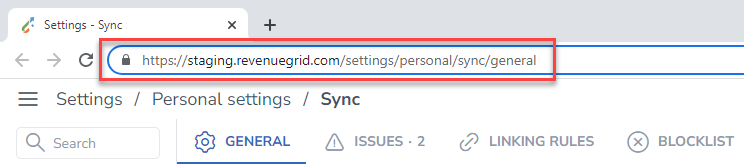
- Select the address starting with https and ending with .com.
Ignore everything after .com
The selected address is your RevenueGridTenantUrl.
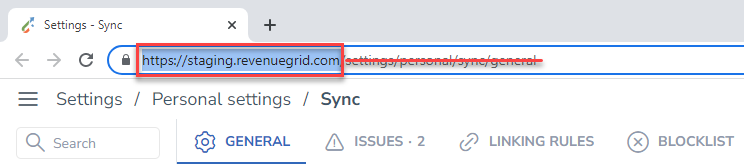
- To generate ServerSyncTenantUrl add the “-sync“-part to the address before .revenuegrid.com and the slash ( / ) after .com
In the very end, you should get the URLs that follow this pattern:
-
RevenueGridTenantUrl
https://[ your tenant ].revenuegrid.com -
ServerSyncTenantUrl
https://[ your tenant ]-sync.revenuegrid.com/
Important
Make sure there is a slash / character at the end of the ServerSyncTenantUrl value and there is no slash / character at the end of the RevenueGridTenantUrl value. Otherwise, the users won’t get Revenue Grid Widget content with no issue cause indication
Generate tenant URLs on the legacy Sync Settings page
-
Open RG Email Sidebar, click the ☰ Menu button, go to Sync settings
-
Next, the Revenue Grid Sync Settings page will open. Find the address bar at the top of the page
- In the address bar, you’ll see the address of the page. Select the address starting with http and ending with .com/. Ignore everything after .com/
The selected address is your ServerSyncTenantUrl.
-
To generate RevenueGridTenantUrl remove the “-sync”-part from the address and the slash ( / ) after .com
In the very end, you should get the URLs that follow this pattern: -
RevenueGridTenantUrl
https://[ your tenant ].revenuegrid.com -
ServerSyncTenantUrl
https://[ your tenant ]-sync.revenuegrid.com/
Important
Make sure there is a slash / character at the end of the ServerSyncTenantUrl value and there is no slash / character at the end of the RevenueGridTenantUrl value. Otherwise, the users won’t get Revenue Grid Widget content with no issue cause indication
How to set up tenant URLs
- Switch to Lightning Experience as described in this Salesforce article
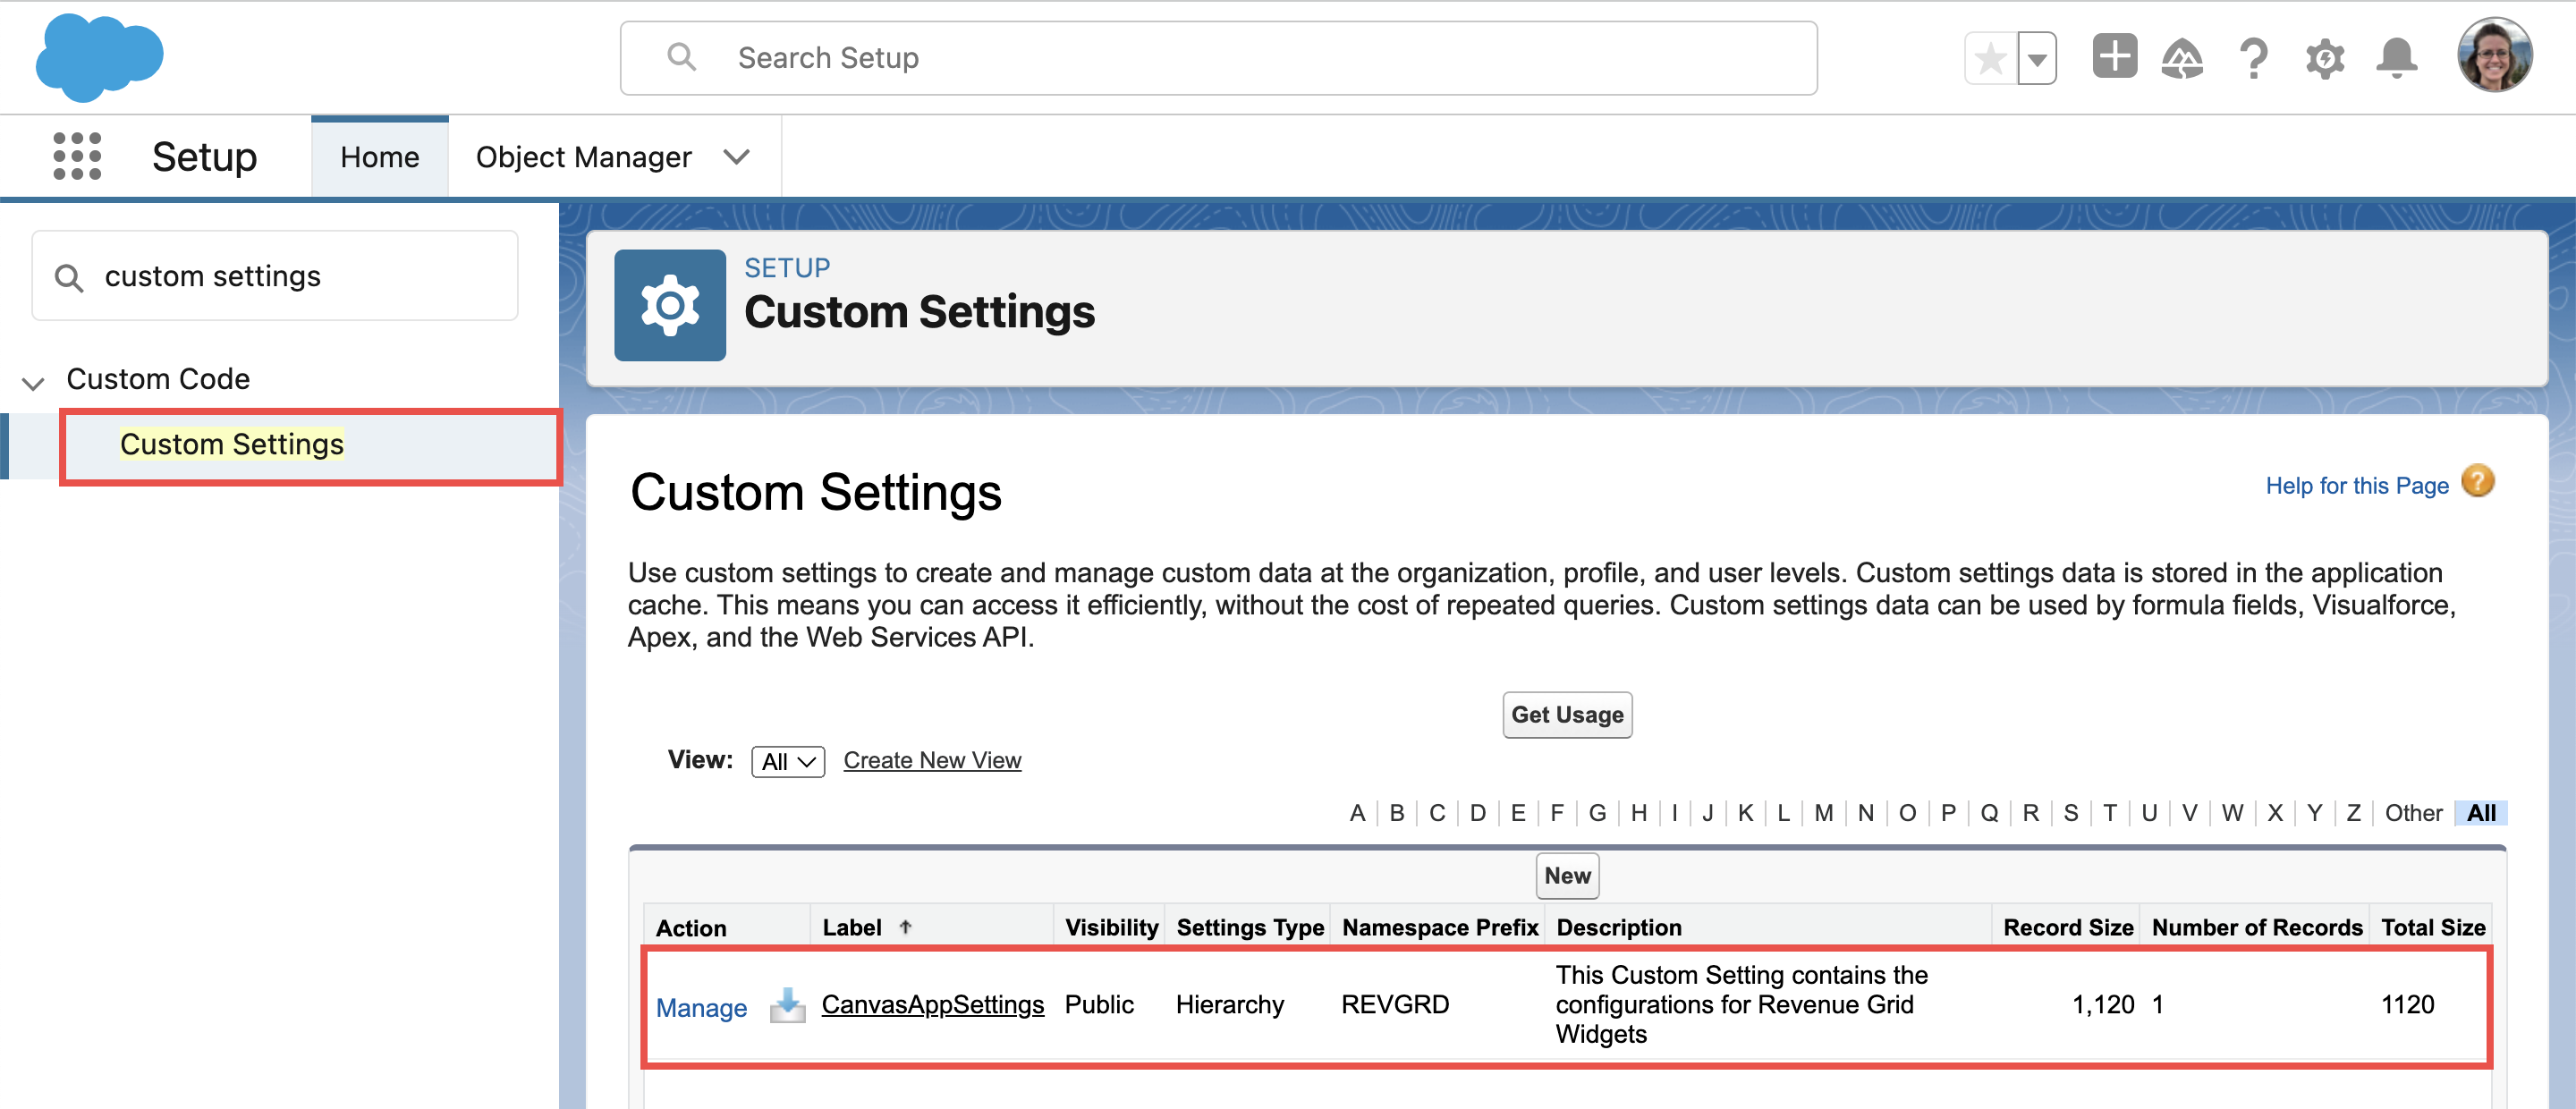
- Open Salesforce Setup settings
- In the Quick Search field type “Custom Settings”
- Click Manage button next to the CanvasAppSettings label; press Ctrl+F to find it quickly if the list is big
- Find the settings RevenueGridTenantUrl and ServerSyncTenantUrl, then click Edit to modify them:
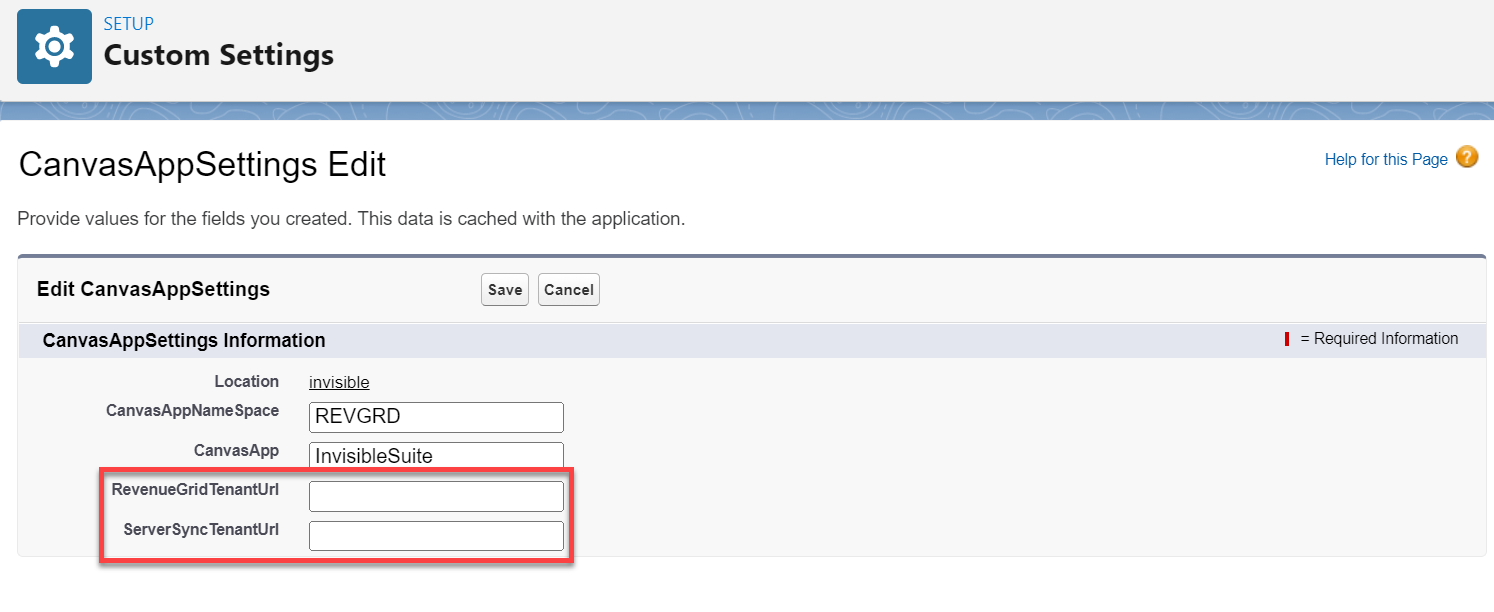
-
Update RevenueGridTenantUrl with a specific RG tenant URL
-
Update ServerSyncTenantUrl with a specific RG tenant URL
Important
Make sure there is a slash / character at the end of the ServerSyncTenantUrl value and there is no slash / character at the end of the RevenueGridTenantUrl value. Otherwise, the users won’t get Revenue Grid Widget content with no issue cause indication
2. Set up user authorization
- Switch to Lightning Experience as described in this Salesforce article
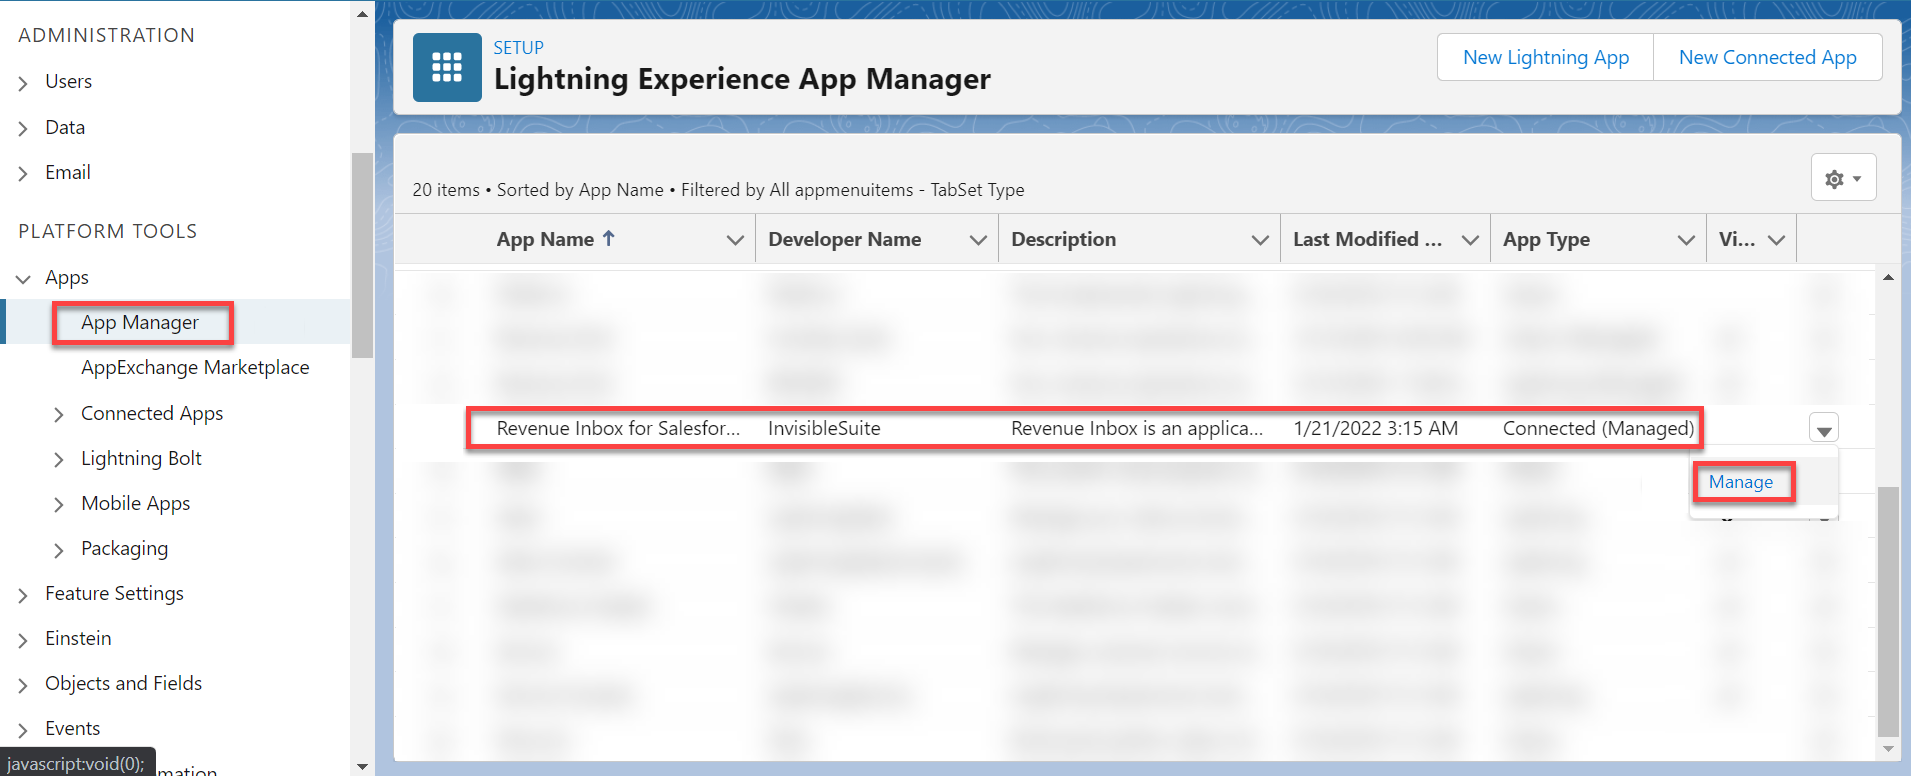
- Click the Gear (Setup Menu) icon in the upper right-hand corner of the page to open Salesforce Setup menu
- In Quick Search type “App Manager”
- Click Manage next to InvisibleSuite App that has a Type Connected (Managed)
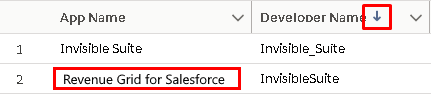
Tip
In case you cannot find the needed item InvisibleSuite - Connected (Managed) on the list, sort the list by Developer Name and look for Revenue Grid for Salesforce
- On the next page, click Edit Policies
- Set the value Admin approved users are pre-authorized in the picklist Permitted Users
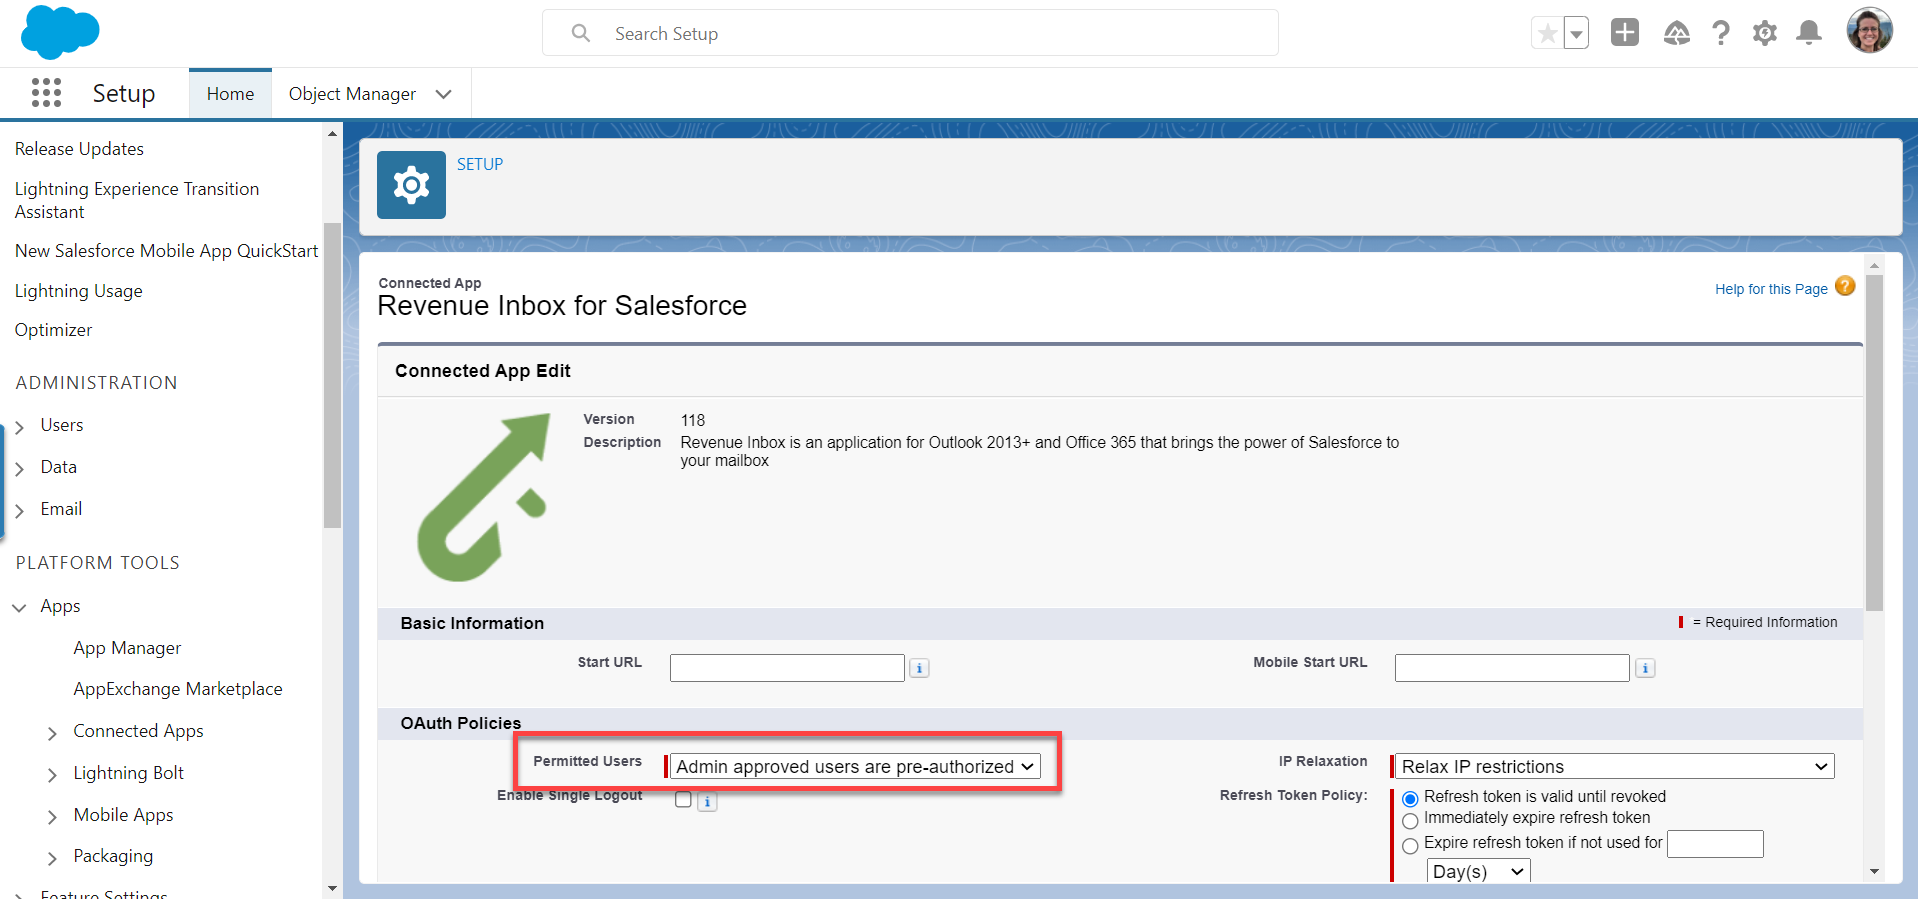
- Click Save to apply configuration updates
How to Configure Contact, Lead, or Opportunity Widgets for a Salesforce Admin User Account
If you configure the widgets for a regular Salesforce user account, the steps provided in this article are sufficient; however, for a Salesforce Admin user extra configuration steps are required to setup the widgets for other users in their org.
Note
The same procedure is used for Contact, Lead, or Opportunity records’ layout adding in Salesforce user interface. The steps are identical
1. Switch to Lightning Experience, as described in this Salesforce article. Go to Contact, Lead, or Opportunity tab in navigation pane
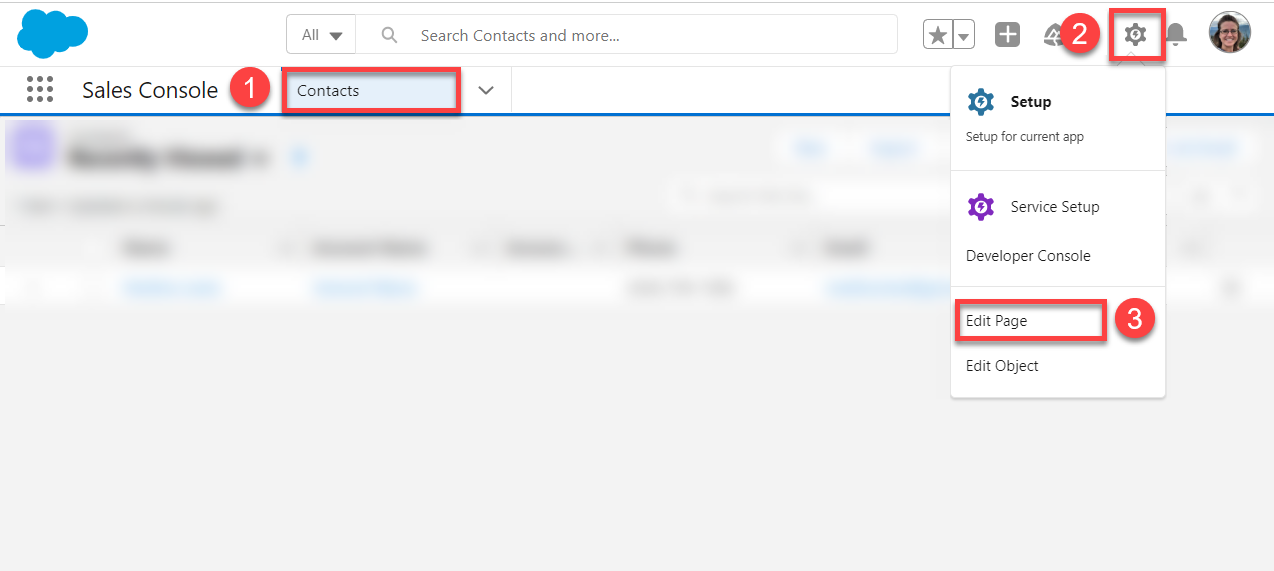
2. Click the Gear (Setup Menu) icon in the upper right corner of the page to open Salesforce Setup menu
3. Select Edit Page in the menu
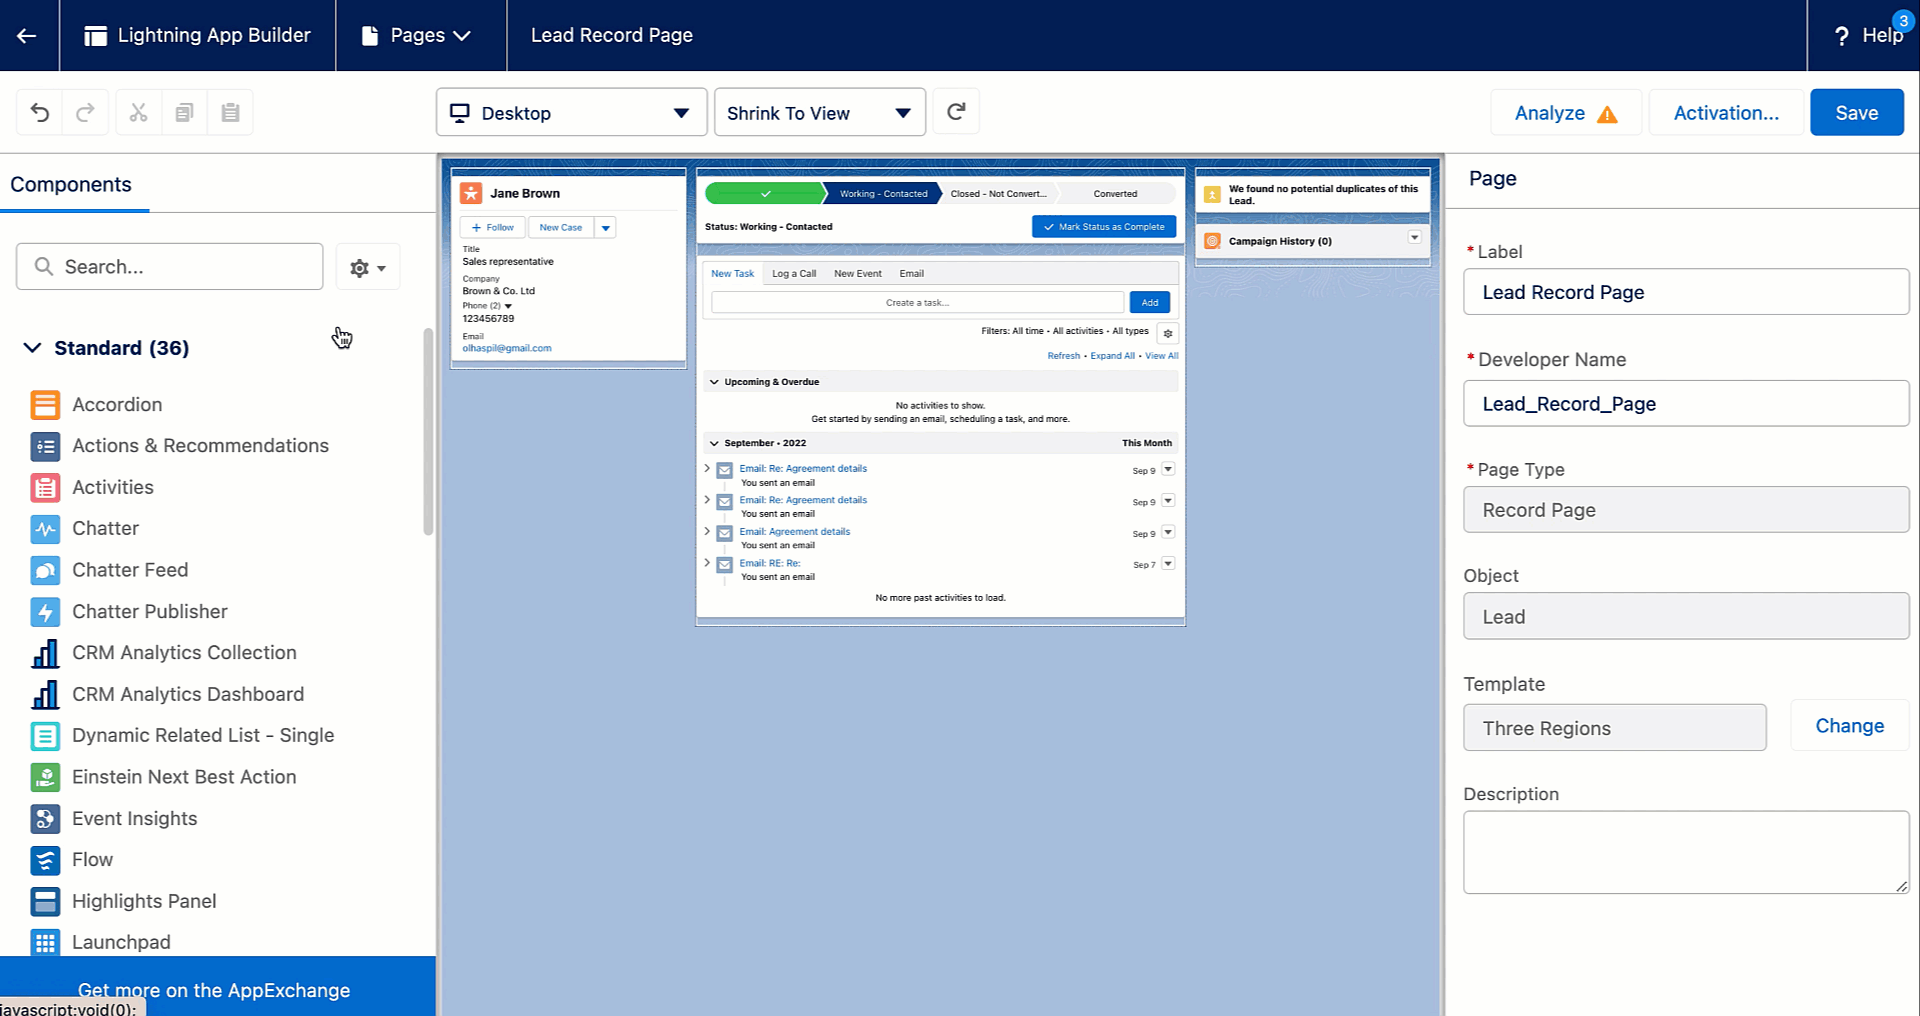
After you get to the Lightning App Builder page, you can modify the page’s layout to include Revenue Grid widgets.
4. Scroll to the bottom of the list in the pane on the left to get to Visualforce item
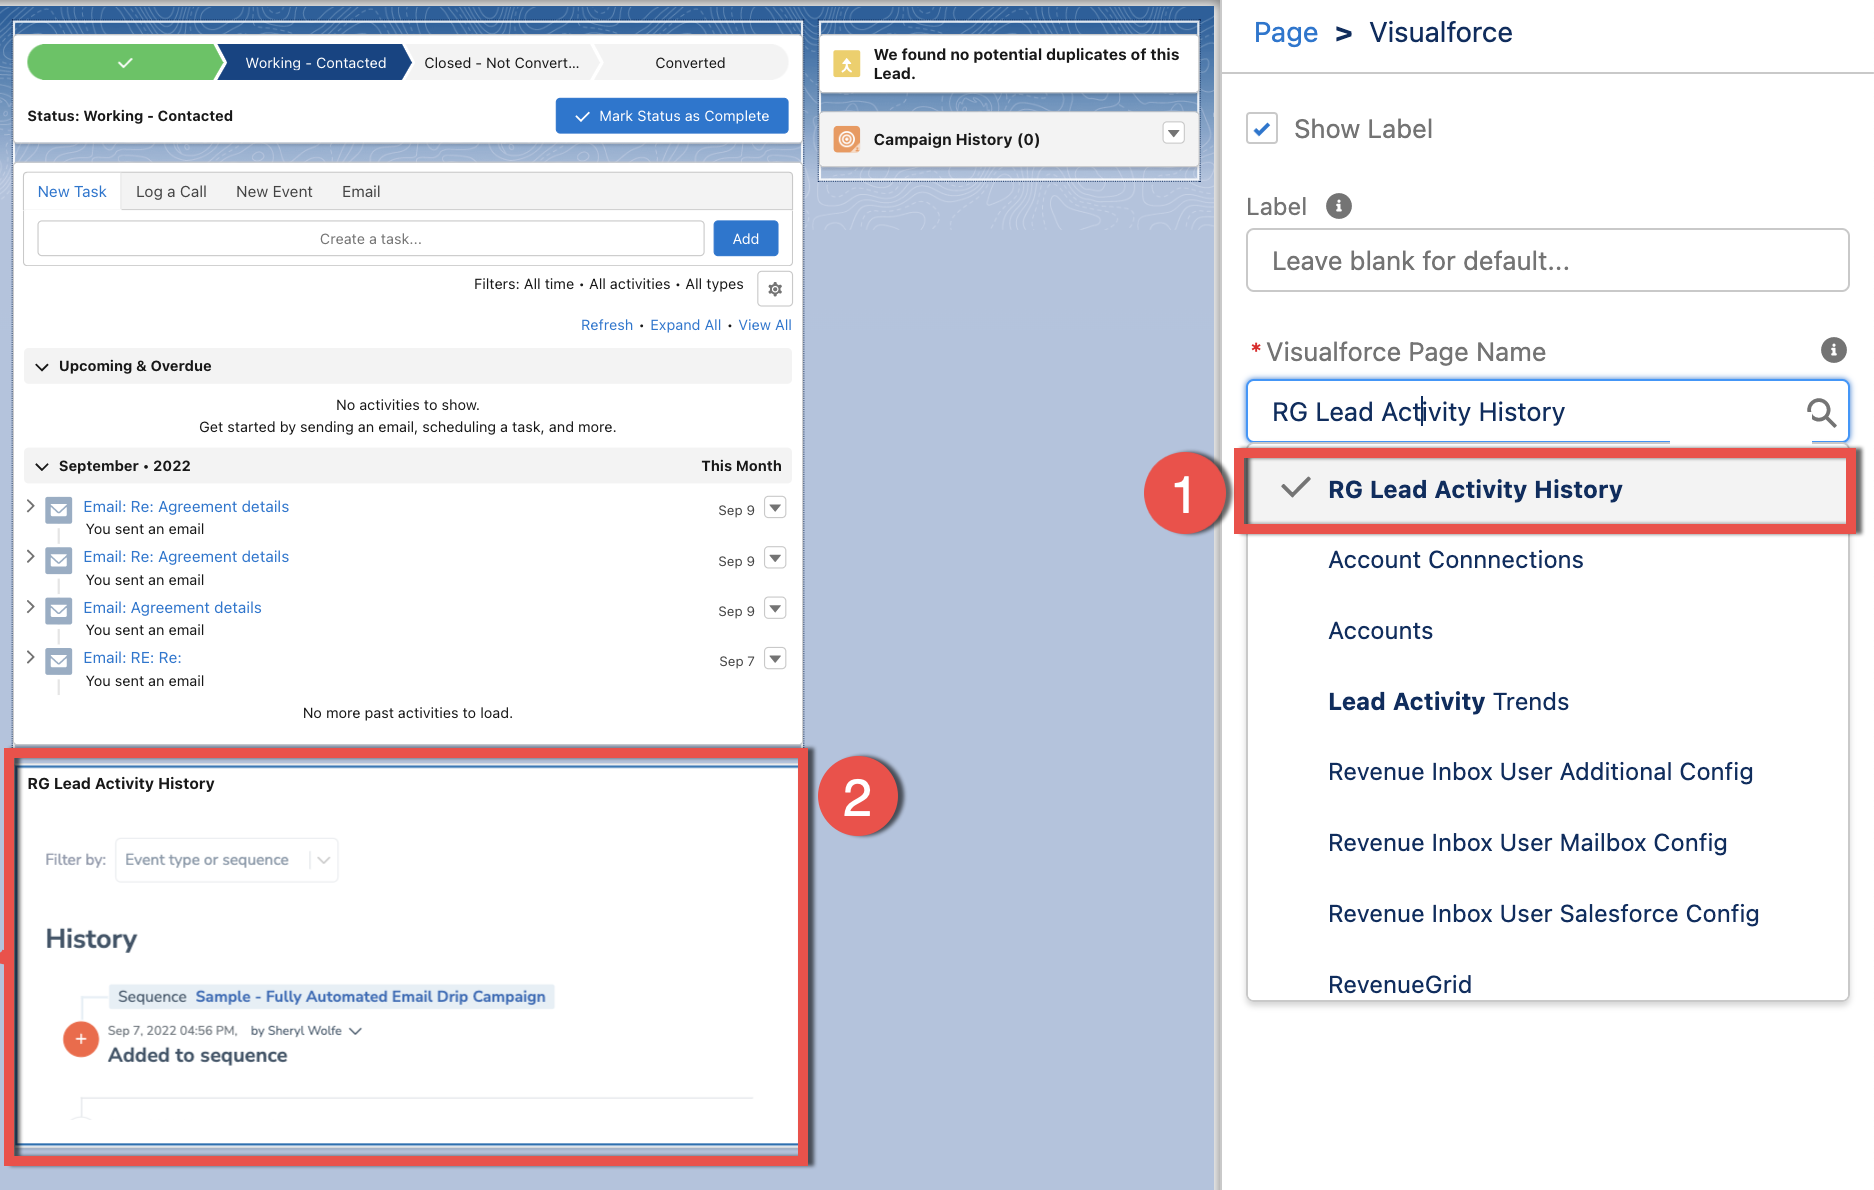
5. Click Visualforce and drag-and-drop this item to the central area:
>>> Click to see a screenshot <<<
6. Set the functionality for this particular frame emerging from Revenue Grid by selecting the necessary widget from the drop-down list “Visualforce Page Name” (1). The selected widget will appear in the Visualforce component on the page (2)
>>> Click to see a screenshot <<<
You may add as many Visualforce frames as you require, the limit is the number of Revenue Grid widget blocks available in the picklist above.
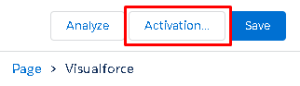
7. After completing the widget Setup click Activation in the upper right-hand corner
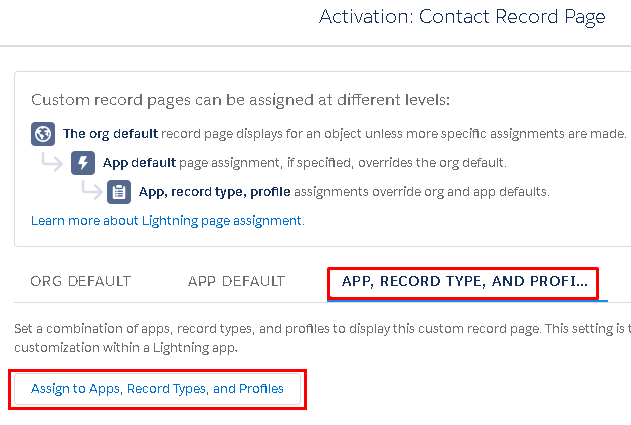
8. In the dialog that appears, switch to App, Record Type, And Profile
9. Click the Assign to Apps, Record Types, and Profiles button:
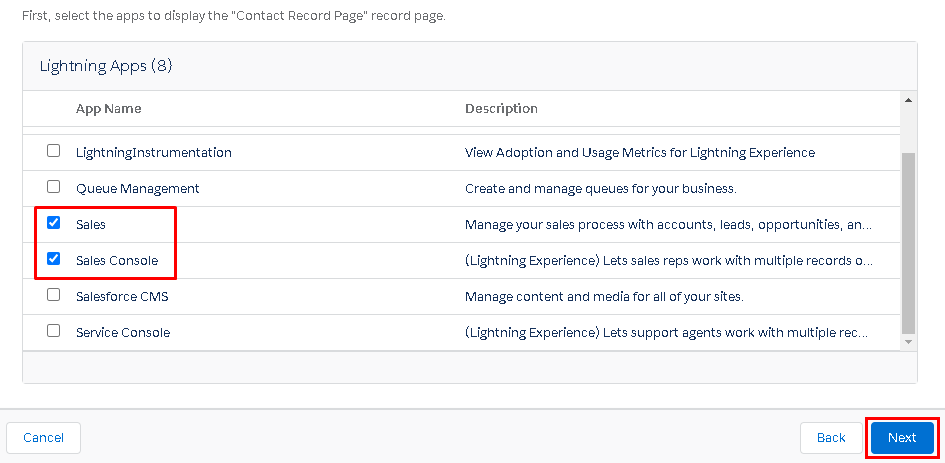
10. Select the Apps that you want to add Revenue Grid Widgets to; most often these are Sales and Sales Console
11. Click Next
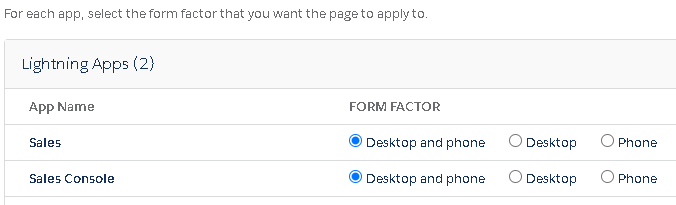
12. At the next page, keep the default Form factor values Desktop and phone and click Next in the bottom right-hand corner
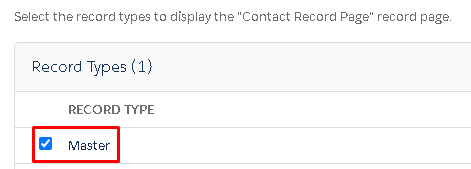
13. Select the checkbox Master and click Next
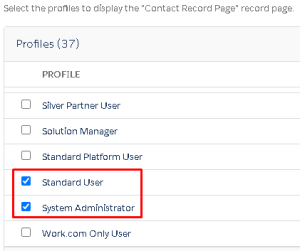
14. Select applicable profile types. Usually, these are Standard User and System Administrator. After that click Next
>>> Click to see a screenshot <<<
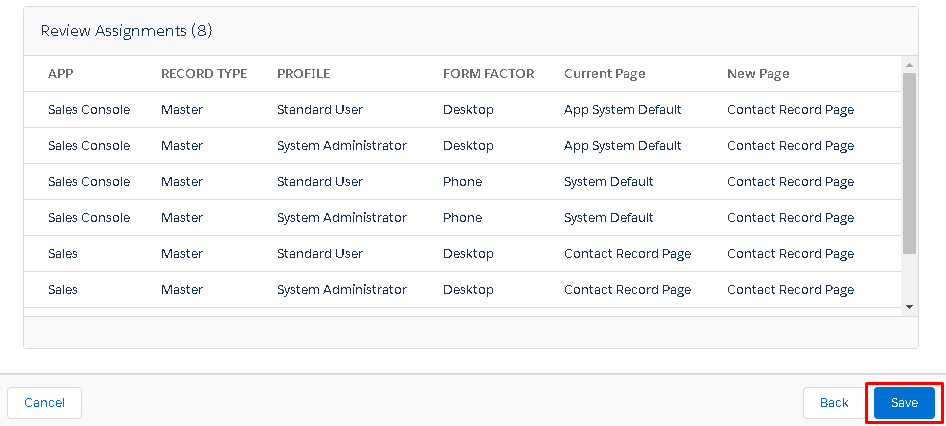
15. Review the sepcified values and click Save button to apply configuration updates
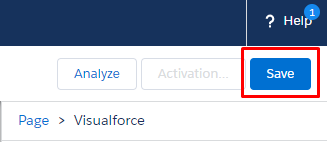
16. Click Save in the upper right corner of the “Lightning App Builder” page to save configuration updates
17. Return from “Lightning App Builder” to the Contact, Lead, or Opportunity tab by clicking the 🡨 (Back) icon in the upper left corner
