Admin level settings
Admin settings page is used to view and adjust the company-wide parameters for users in Revenue Grid (RG).
To access Revenue Grid Settings, click the Settings icon in the top right corner of the RG interface.
Now more detailed about every of the tabs.
Important
These tabs are editable only by users with Admin rights and changes get applied to all RG users company wide.
Configure Action Center
In this section, you can configure the specifics of working in the Action Center for end users.
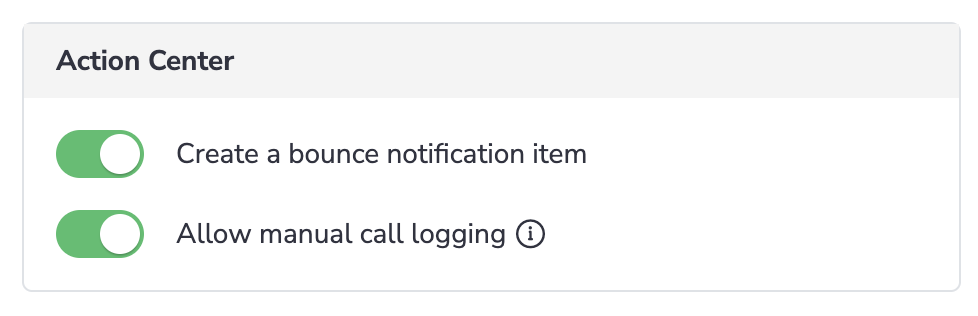
Go to Settings → Platform settings → Sequences → General → Action Center.
Create a bounce notification item
This switch button controls whether users will get a notification about undelivered emails when the recipient’s mailbox doesn’t receive incoming emails. Such items appear on the Notifications tab in the Action Center.
That may occur due to a typo in the email address on creating a contact in Salesforce, or the prospect’s email doesn’t exist anymore.
Allow manual call logging
For Twilio users only
If your company does not use Twilio, disabling manual calls logging will make it impossible for your users to log any calls to Salesforce.
You can disable the possibility for users to manually log calls made from another device without using Twilio.
When the “Allow manual call logging” switch button is disabled, users will only be able to add comments to Twilio calls that were automatically logged to Salesforce.
Control what to sync with Salesforce
Go to Settings → Platform settings → Sequences → General.
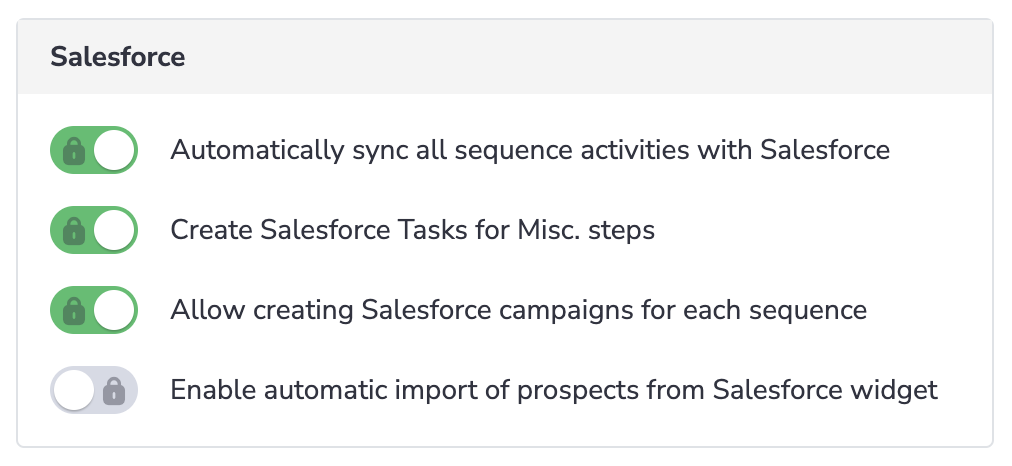
- Control automatic synchronization of all activities generated by sequences with Salesforce.
- Enable auto-saving of misc. steps to Salesforce as completed Tasks.
- Allow creating Salesforce campaigns for each sequence.
- Enable automatic import of recipients into Revenue Grid from Salesforce email send out widget.
Allow upload and export from/to CSV
Go to Settings → Platform settings → Sequences → General.
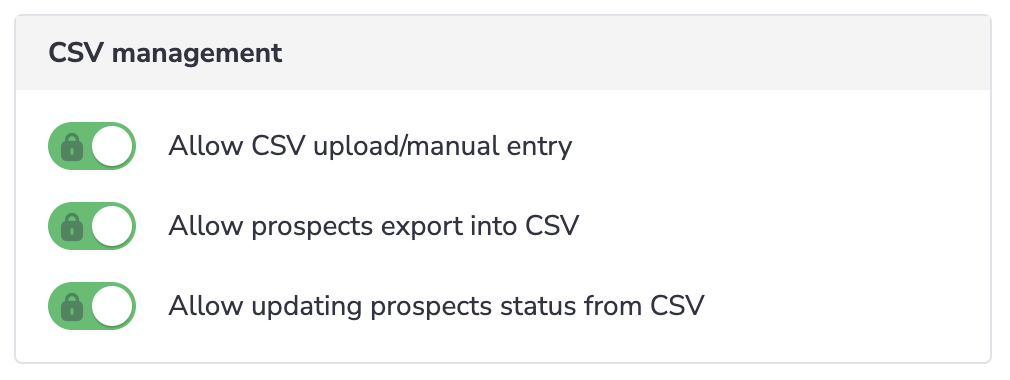
These check-boxes enable option to upload and download prospects from/to a CSV file on the Recipients tab of a Sequence, as well as on the Audience tab.
Configure default country code and time zone for sending
Go to Settings → Platform settings → Sequences → General.
In the Sending section, specify the default country code and time zone which will be used for sending out steps for prospects with no country and time zone specified.
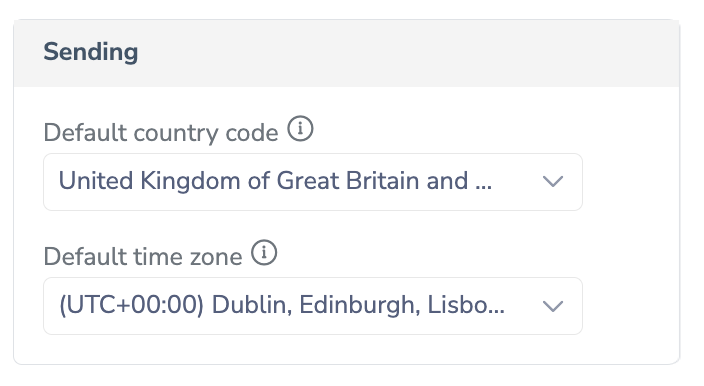 Default country code - the country whose calendar that must be used when planning Sequence steps for recipients with no specified country to schedule steps only on business days.
Default time zone - the time zone that must be used when planning Sequence steps for recipients with no specified time zone.
Set up auto-dismissal of items in the Action Center
You can set up auto-dismissal of notifications about auto-replies, calls and misc. to-do items in the Action Center.
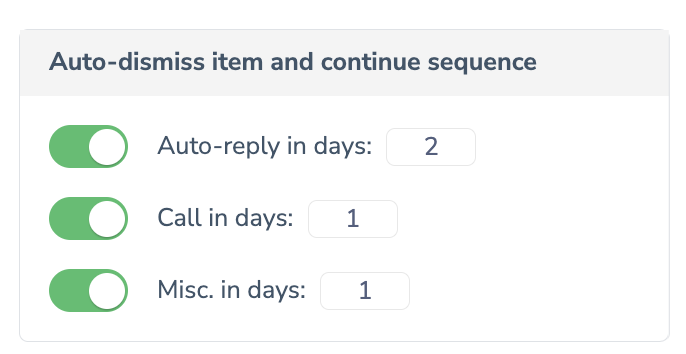
Auto-dismissal affects all existing and future items for which auto-dismissal is enabled. After enabling auto-dismissal for specific items, all active sequences paused due to these item types will continue with the next steps for all relevant users.
You must specify the delay for auto-dismissing to ensure that your colleagues have enough time to review and process the notifications and to-do items in their Action. The delay can vary from 1 to 999 days.
Important
Enabling auto-dismissal will affect all users.
Before enabling auto-dismissal, ask your colleagues that work with sequences to review their Action Center notifications. This will prevent renewing sequences that were stopped for a long time, outdated or irrelevant sequences
Set company-wide defaults for sequences
Go to Settings → Platform settings → Sequences → Defaults.
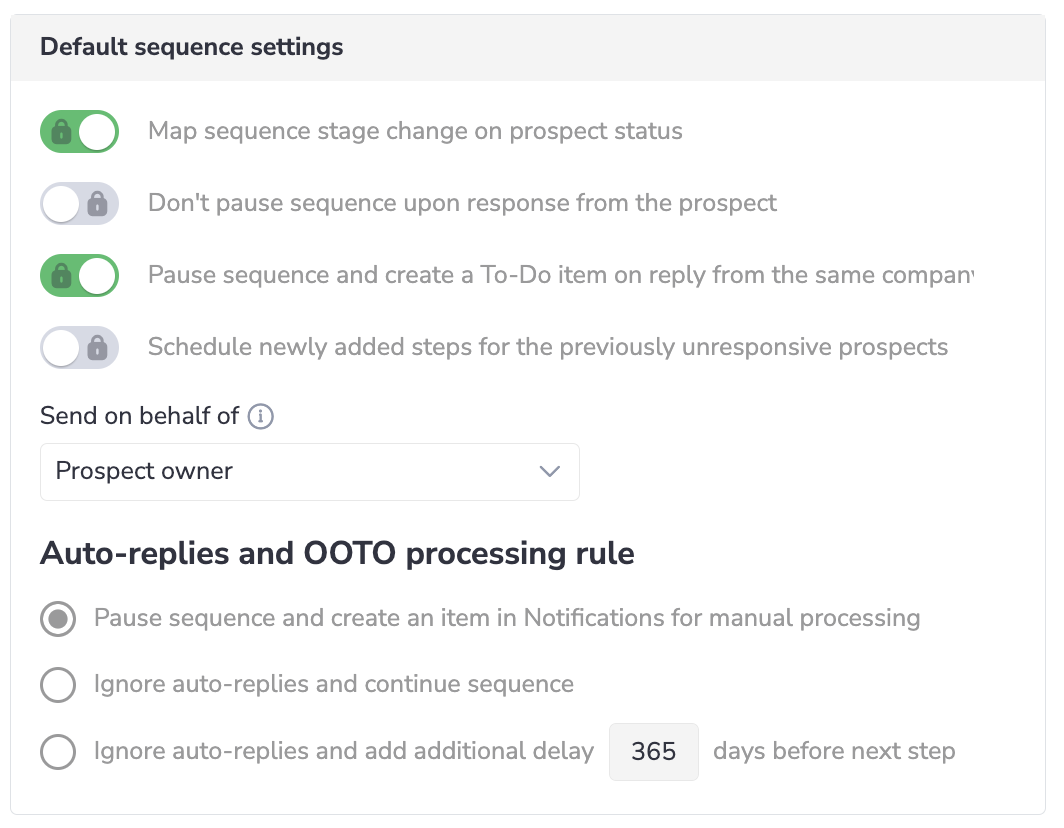
Here, you can configure default settings and auto-replies and OOTO handling settings for all newly created sequences. All new sequences will inherit the default settings unless the sequence owner changes these settings for a specific sequence on the Sequence Settings page. Settings on the sequence level override the default organization-wide settings specified by admins.
Map sequence stage change on person status is used to update a recipient’s Person Status once Sequence Stage changes.
Don’t pause sequence upon response from the prospect controls whether a Sequence pauses for the recipient when one replies. Normally, when a Sequence sends an email and a recipient replies to it, then the Sequence won’t proceed to the next step for that recipient until you process his/her reply manually on the Action Center.
Pause sequence and create a To-Do item on reply from the same company pauses all upcoming outreaches to all recipients belonging to the same company once a reply from at least one person from that company is received. This switch button can be enabled only if Don’t pause sequence upon response from the prospect is disabled.
Schedule newly added steps for the previously unresponsive recipients is used to start reaching out, with additionally added steps, to those of prospects who had been Unresponsive, and the prospects’ status will go back to Approaching.
Create a linked Salesforce campaign automatically creates a Salesforce campaign linked to all new sequences.
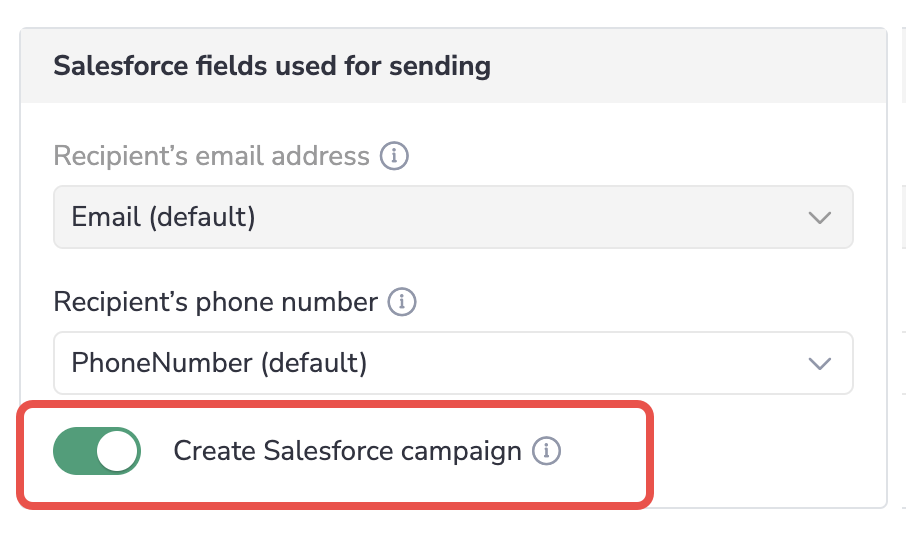
When this setting is enabled:
-
The prospects get down-synced from Salesforce into Revenue Grid. You can only add prospects to the Salesforce campaign. Adding recipients in Revenue Grid becomes unavailable.
-
Some sequence statistics get up-synced from Revenue Grid to Salesforce.
Select on whose behalf Shared sequences are sent out
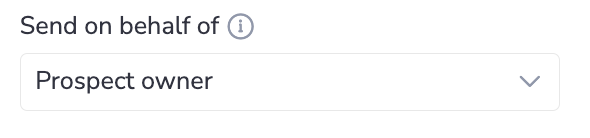
Select from whose account (email address and phone number) the sequence outreaches will be sent out to the recipients in Shared sequences: prospect owner or user who’s added the prospect to sequence.
Auto-replies and OOTO processing rules
Set the rule for handling of Out of the Office (OOTO) and other automatic responses:
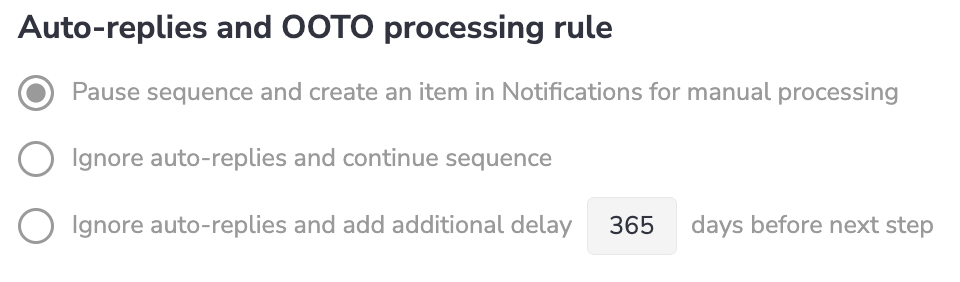
- Pause sequence and create an item in Notifications for manual processing - enable if users must process every auto-reply manually, e.g. to reschedule a sequence step
- Ignore auto-replies and continue sequence - enable if sequences must proceed disregarding the auto-replies
- Ignore auto-replies and add additional delay {Days} before next step - enable if sequences must proceed disregarding the auto-replies but with automatic increase of the interval between steps by a set number of days
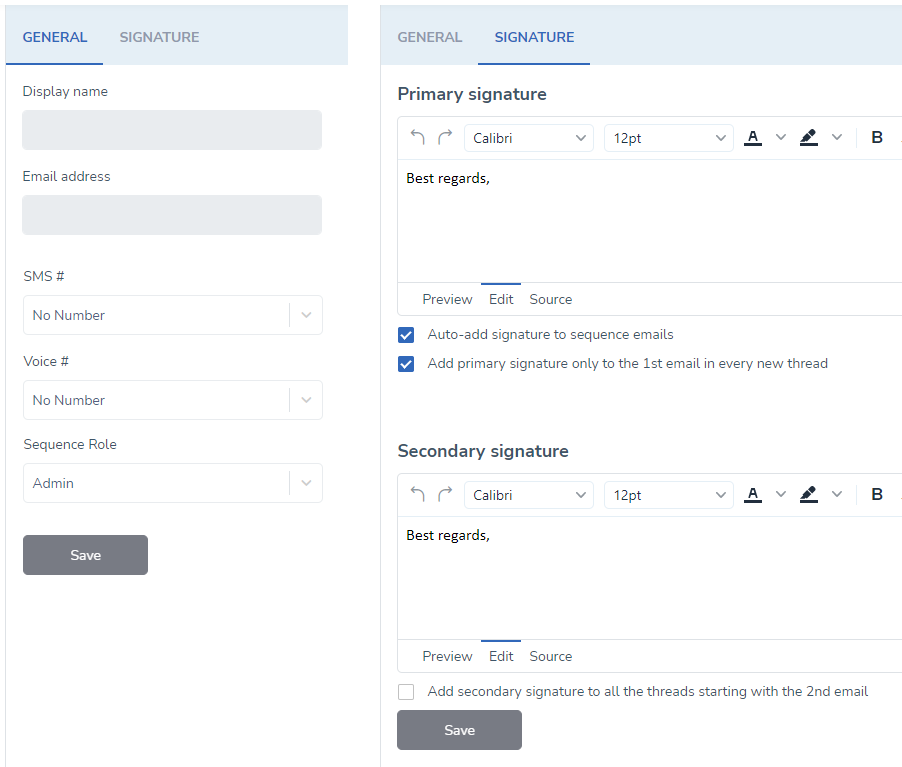
Company-wide default signatures, unsubscribe and BookMe text
Go to Setting → Platform settings → Sequences → Merge fields to change company-wide default signatures, unsubscribe and BookMe text that are being used in Sequence emails.
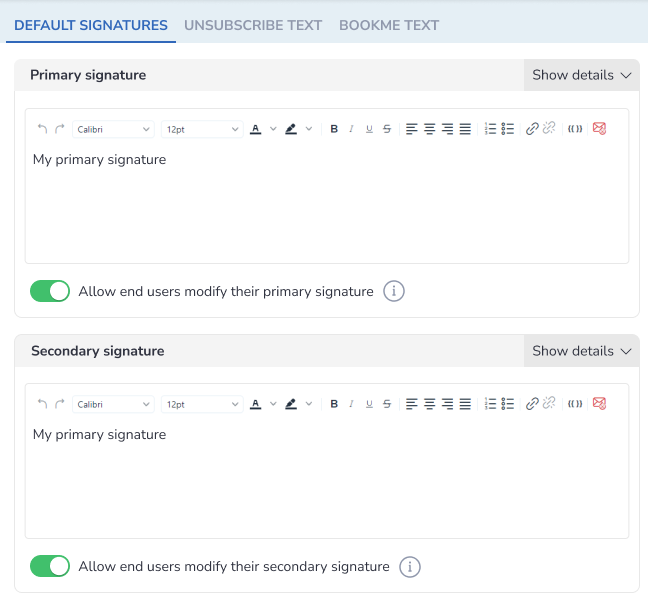
Here Admins can set the default Primary and Secondary signatures which will be applied company-wide. By enabling/disabling the switch button below, the Admins can allow the end users to override the default signatures and modify the signatures.
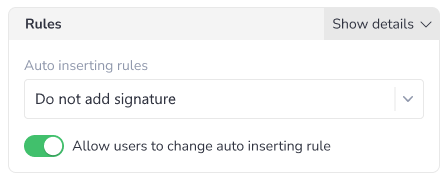
On this page, Admins can also change the auto-inserting rules for default signatures: do not insert them or select a specific inserting pattern.
By clicking the Force reset users’ signature settings button, you will reset all users’ signatures the default signature.
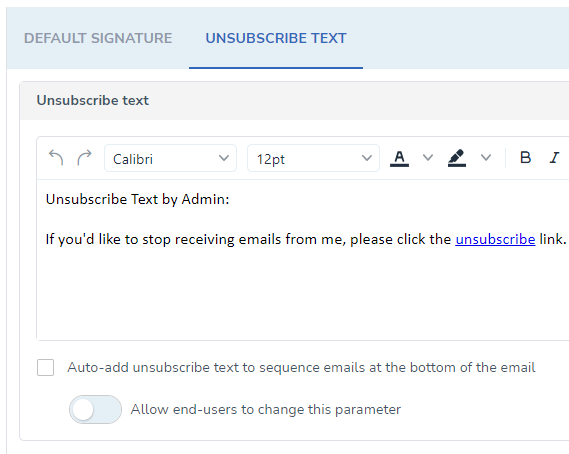
Set company-wide unsubscribe link
 On the Unsubscribe subtab, Admins set company-wide standard for unsubscribe text.
By enabling/disabling the switch button, the Admins can allow the end users to override the default unsubscribe text and modify it.
Also, here they can configure auto-insertion rule for unsubscribe text.
Set company-wide BookMe link
On the BookMe subtab, Admins set company-wide standard for BookMe text that is inserted by the end users in their Sequence emails.
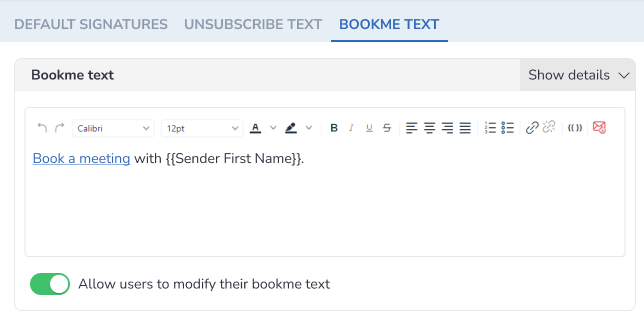
By enabling/disabling the switch button, the Admins can allow the end users to override the default BookMe text and modify it.
Status updates
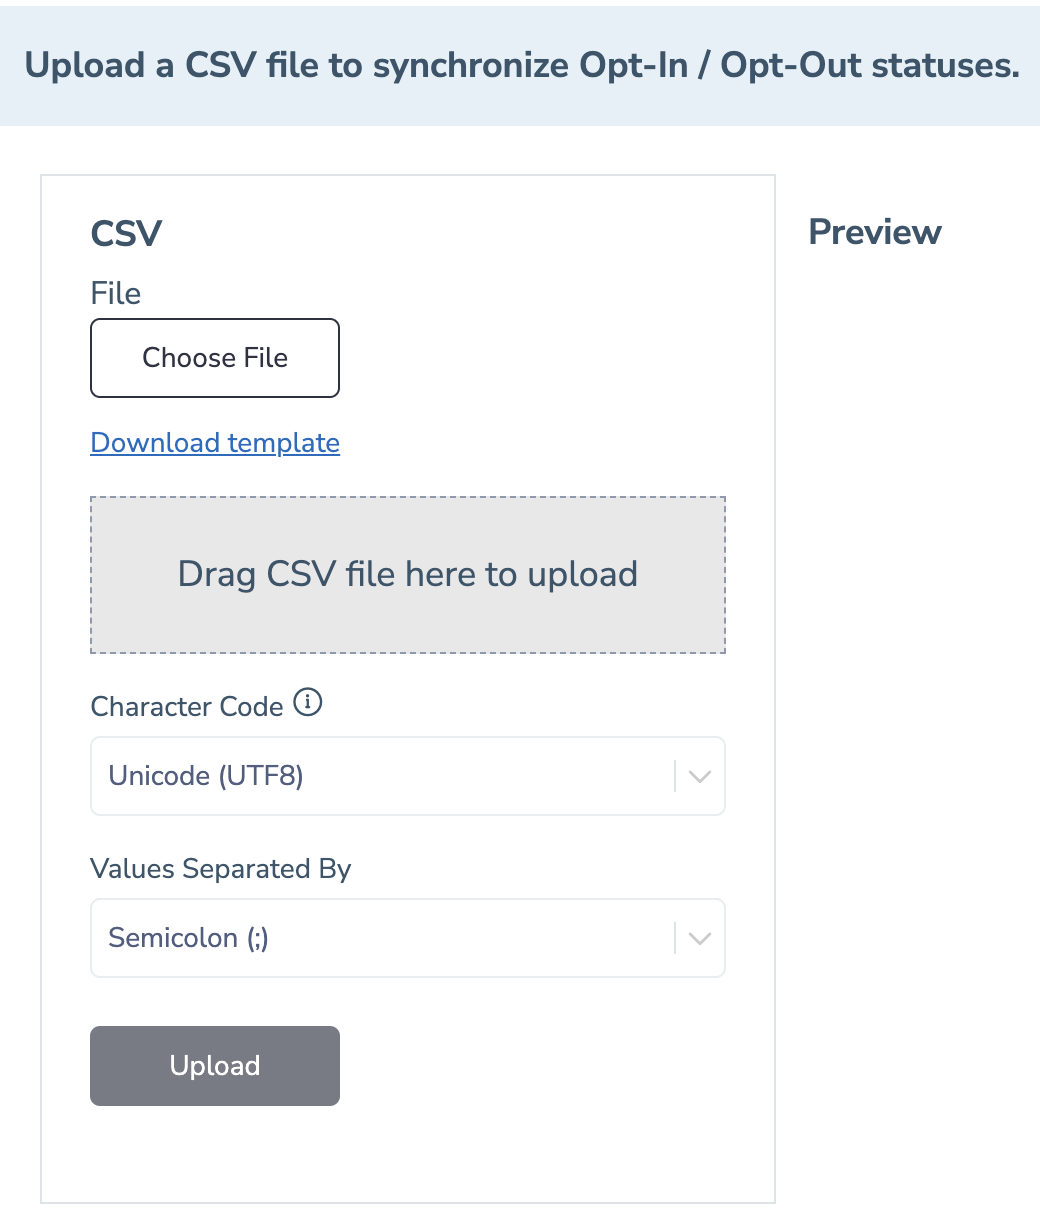 Go to Setting → Platform Settings → Sequences → Status updates subtab.
Upload a CSV file to synchronize Opt-In / Opt-Out statuses.
Go to Setting → Platform Settings → Sequences → Status updates subtab.
Upload a CSV file to synchronize Opt-In / Opt-Out statuses.
Note that this subtab appears only if the Allow updating prospects status from CSV checkbox is enabled on the General subtab.
Select SMS and call provider
Go to Setting → Platform Settings → Sequences → SMS & Calls subtab.
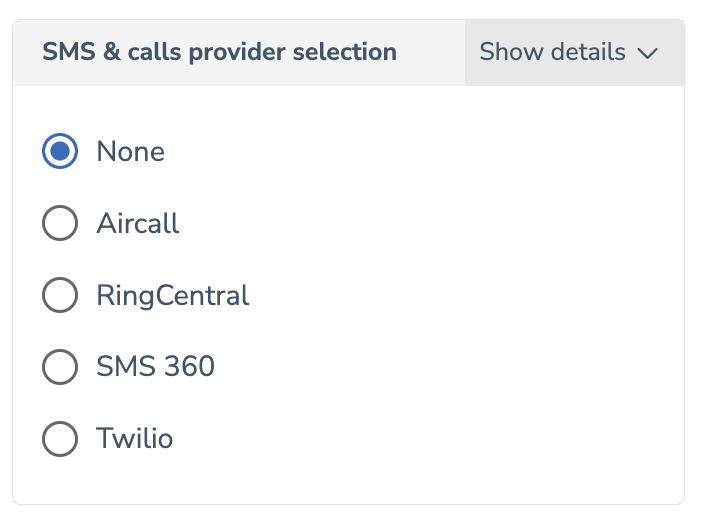
Available SMS & calls providers:
-
Twilio. Detailed Twilio setup guide in this article.
-
Aircall. Detailed Aircall setup guide in this article.
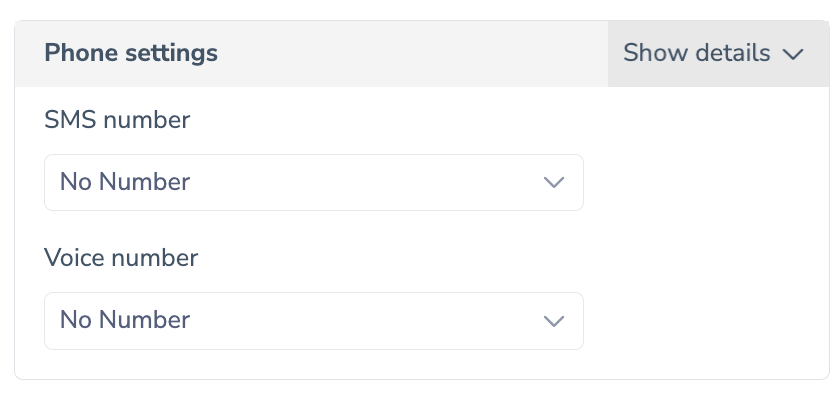
When this Admin level setting is in place, every user will be able to choose a single number from a pool of available to them numbers on their Settings → Personal settings → Sequences → General → Phone settings. Or admin can set phone settings for each user manually.
Control sending capacity and other limits
Go to Settings → Platform Settings → Sequences → Limits. Enforced limits to the number of RE Sequence emails sent by RG users.
Number of sequence email/sms touches an RG user can send per day
To prevent SPAM generation, most email services impose a limitation on the number of emails a user (or automated emailing software) can send through a single email account per specific period of time. The applied limit is 1 email sent per 1-2 minutes.
When Revenue Grid sends out emails, both custom written by a user and automated ones, it respects this limitation, observing the one minute minimum interval between sending emails.
The recommended (default) value of this setting is 500 emails; this value approximates the maximum number of emails that can be sent over a standard working day's span with a one minute interval. It is the emails quantity "bandwidth" shared by all email sequences you run in RG.
When the limit is reached, all remaining automated emails have to be postponed to the following day's sending span defined by the Sequence's Schedule, regardless of the step's actual timeline. Therefore, please consider this standard limit of 500 emails/day per RG user when planning your emailing campaigns.
The maximum value that can be set for this parameter is 1000, that is approximately 17 hours of automated emailing per 24 hours. If you do not set a limited daily Schedule for the Sequence (for example to imitate emails sending by a real person) that is emails sending will be allowed for 24 hours, this increased limit is easily attainable, since the automated emails are sent out by your email server.
Tip
In a realistic common case scenario a single RG user can send out around 100 emails per working day; this number is defined by his/her capability to process the recipient’s responses to these emails. However, a informative mass email campaign that requires no specific response can make use from the maximum emailing “bandwidth”.
Please note that there is also another factor that defines individual emails dispatching patterns, the Schedule idle parameter set for Sequence steps
Number of sequence call, misc and signal steps scheduled per day
Set the limit to number of automatic or manual steps of these types that can be scheduled per user per day.
Sequence touches limit per email domain per day
Set the limit of touches per specific domain to avoid overwhelming a certain company with your outreaches.
Sequence touches limit per prospect per day
The number of RG sequence emails allowed to be sent to a prospect per 24 hours. This parameter is set depending on the essence of the campaign and the target auditory. Normally the maximum number of such emails should not exceed 5, not to get a prospect annoyed. Note that this number does not include extra “custom” emails message composed by a RG user, for example a reaction to a prospect’s reply or a follow-up clarifying a previously sent email. This parameter’s default value is 5 and the maximum value is 10.
Sequence touches limit per prospect per week
This parameter is similar to the above one, only it sets the RG sequence emails limit imposed over a period of one week. This parameter’s default value is 10 and the maximum value is 20.
Active sequences per prospect
How many active sequences a user can have at the same time.
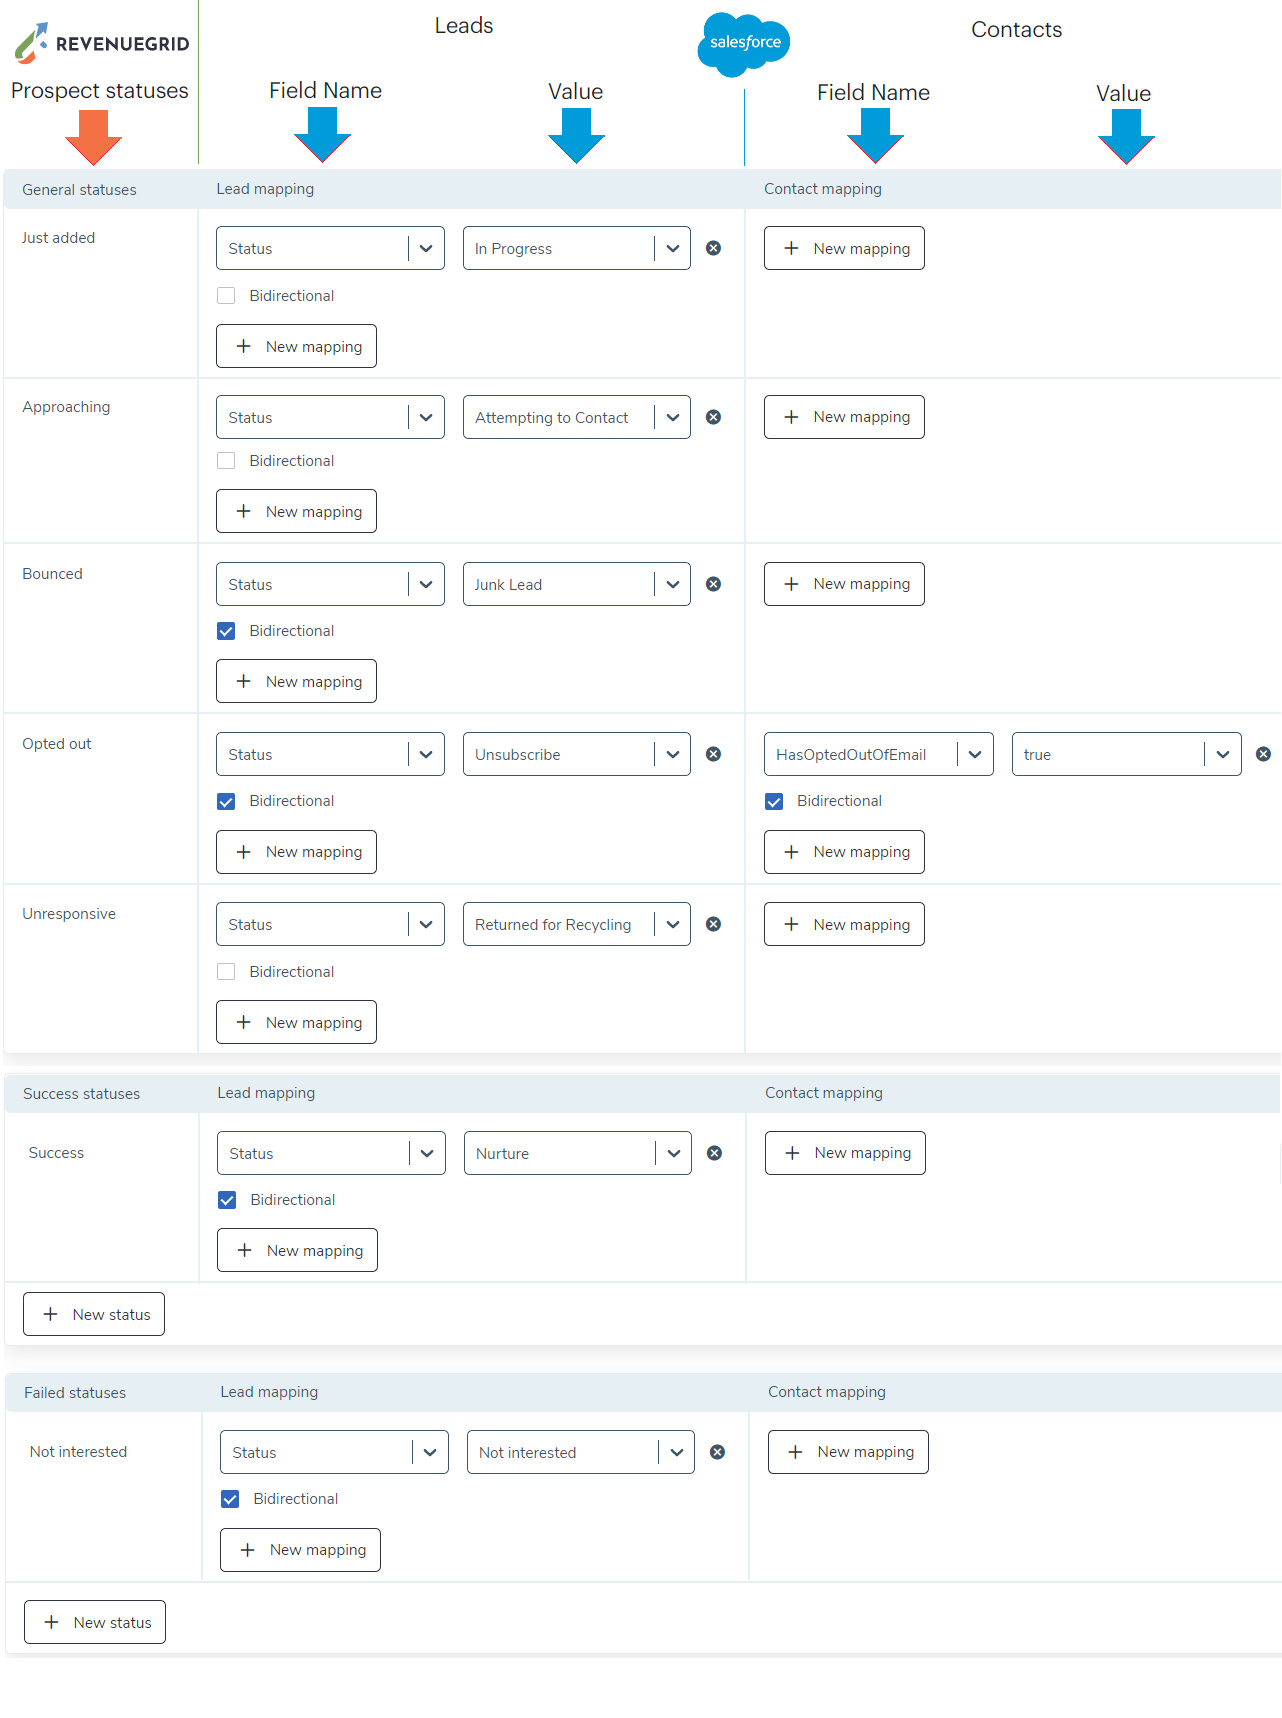
Customize status mapping to Salesforce
Go to Setting → Sequences under Platform Settings → Status mapping subtab. On this tab, Admins can map Prospect statuses to any value of any field in Salesforce for seamless mirroring, as well as create additional Prospect statuses tailored for any possible business need. Updates on this tab will get applied to all users in an Organization.
By default, you get these Person statuses mapped to following values of the selected Salesforce fields (see the picture below).
Manage sending schedules
Go to Settings → Sequences under Platform Settings → Schedules subtab. On this tab you can create and manage email send-out schedules which you use in RE Sequence.
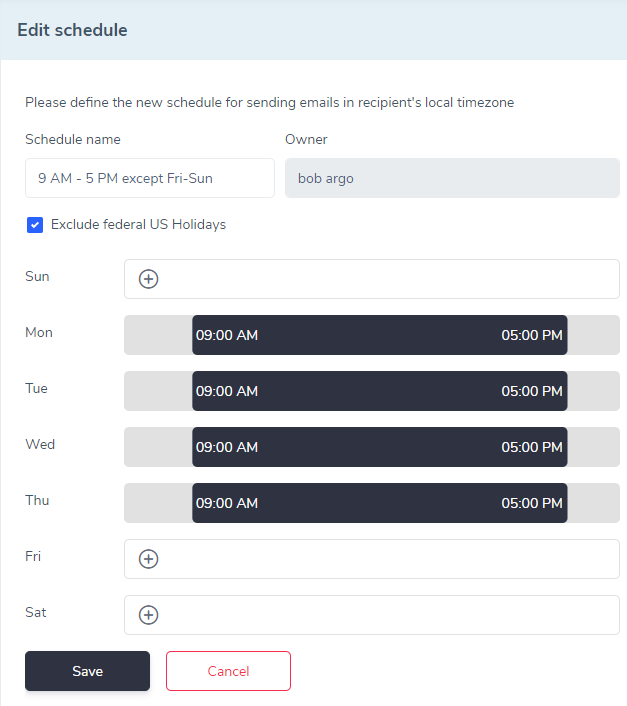
A schedule is a set of specific days of the week and daily time intervals (set in the prospect’s Time zone retrieved from Salesforce) used in RG Sequences. Automated emails sent by Revenue Grid will only be dispatched on these days and within these time intervals.
If you wish to exclude automated emails sending on the dates which are public holidays in the USA, you need to select the checkbox Exclude federal US Holidays in the schedule creation/editing dialog.
Note
Automated sequence steps are sent out according to the configured schedule. However, the actual send time may vary due to message volume and system-wide sending limits. For details, see How automated sequence step sending works.
The schedules you select for your sequence steps are overridden by wait intervals set for individual steps.
For example, if you create a sequence consisting of steps scheduled for every other day of the week except weekends (that is 3 sequence emails per business week) and set the wait interval between the steps to two days, the steps will be performed with a two day long interval (that is 2 sequence emails per business week).
At the same, if the schedule implies sending one email per week, a two day long wait interval between steps will be always observed, not affecting the sending schedule.
Manage signals
Go to Settings → Signals subtab. This setting is available to Managers only. Here you can select which signals to run company-wide.
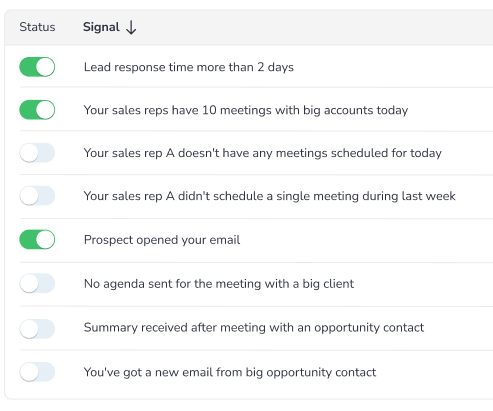
Once a signal is disabled, already generated signals of that type will not disappear from the interface until resolved.
Manage all users
Go to Settings → Users subtab.
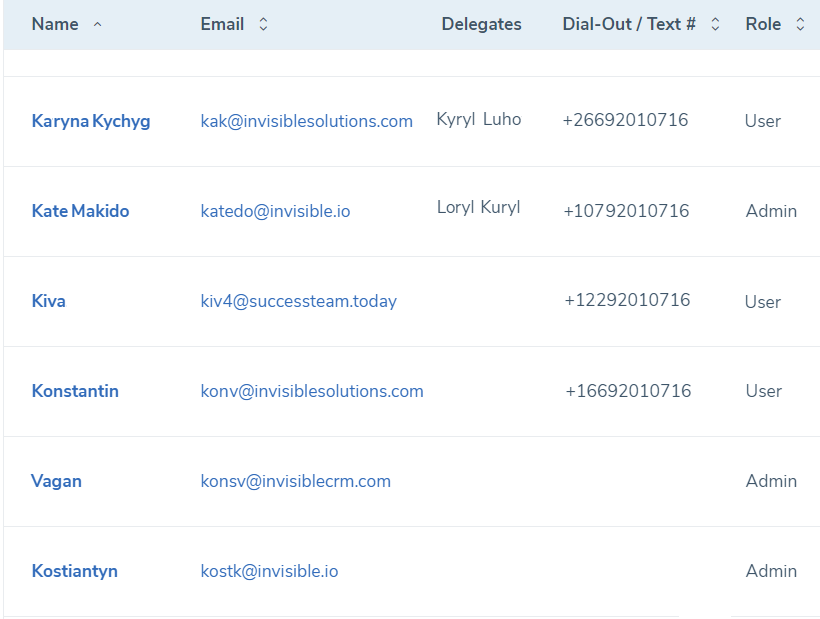
On this tab, Admins can see company-wide Revenue Grid users, their:
- Names
- Emails
- Who are their delegates (if any)
- What is their Dial-out and Texting phone numbers (if any) to perform SMS and Phone call types of steps, and
- Role (Admin or a regular User)
By clicking on a user, Admins can see their Account tab, where they can set up delegates, select SMS and Voice numbers, grant admin rights, and set up Primary signature.