Update Revenue Grid managed package in Salesforce


To stay compatible with the latest Salesforce updates and ensure new Revenue Grid features work as expected, we regularly release updates to the Revenue Grid managed package. The updates include auxiliary custom fields, classes, and other components.
Important
Starting from version 1.87, Revenue Grid widgets are implemented using Lightning Web Components and Named Credentials. As a result, these widgets—and the updated Revenue Grid app—are available only in Salesforce Lightning Experience.
- If you’re using Salesforce Classic, we recommend switching to Lightning Experience to access all insights and functionality provided by the updated widgets.
- If you’re using Lightning Experience but still rely on Classic-based apps, do not replace existing widgets with the new ones. Instead, use the corresponding widgets available in the new Revenue Grid app, or create a custom Lightning app that supports the required functionality.
Check your current package version
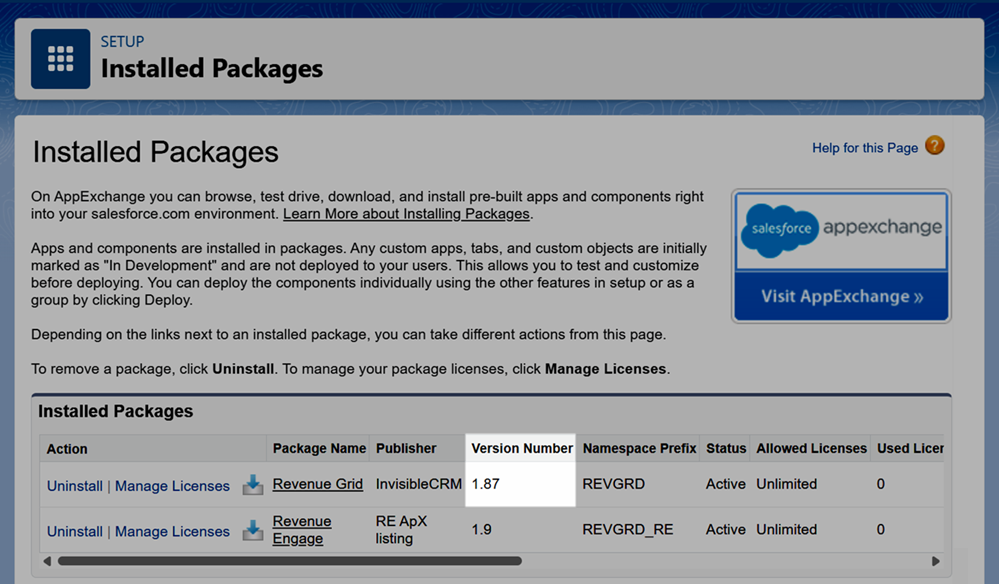
Before you begin the update, check which version of the Revenue Grid managed package is currently installed in your Salesforce organization.
- Open the Salesforce Setup page.
- In the Quick Search field, enter Installed Packages, then select Installed Packages from the results.
-
Find Revenue Grid in the list. The version number appears in the Version Number column.
Use this information to determine which update steps apply to you in the Determine your update path section.
Determine your update path
Before you start, identify which update path applies to your organization based on your current installed version of the Revenue Grid managed package.
Follow these guidelines:
- If you’re already using version 1.87 or later, you only need to complete Step 1.
- If you’re updating from version 1.83 or earlier to version 1.87 or later, you must complete both Step 1 and Step 2.
Note
To check your current version, follow the instructions in the Check your current package version section.
Step 1: Update the Revenue Grid managed package
-
Open the new managed package link in your web browser. The package’s publisher, InvisibleCRM, is an old Revenue Grid brand.
- Revenue Grid managed package (version 1.89)
- Revenue Grid managed package for Salesforce Professional Edition
Note
The managed package is guaranteed to be secure, confidential, and free of any malicious content, under Revenue Grid Privacy & Security policies.
-
Log in to your Salesforce account (you must have Admin permissions in your org).
-
Indicate if you want to upgrade the package for:

- Admins Only
- All Users
- Specific Profiles (recommended) – limits access to selected users who need the Salesforce Scheduler integration.
-
If you select Specific Profiles, set access for the required profiles using the provided controls. For detailed instructions, refer to this Salesforce guide.

-
Click Upgrade.
-
(If updating from version 1.83 or earlier to version 1.87 or later) Select Yes, grant access to these third-party web sites, and click Continue.
 6. Click Done.
You will receive an email message from Salesforce confirming that the package was upgraded.
Note
If the error “This package can’t be installed” occurred on the managed package installation to the Salesforce Professional Edition, refer to this article to learn how to handle the issue.
Step 2: Post-upgrade setup (only if upgrading from version 1.83 or earlier)
After upgrading the managed package from version 1.83 or earlier to version 1.87 or later, you must complete additional configuration steps for the Revenue Grid app in Salesforce.
Obtain your tenant URL and authorization credentials
Before you configure the integration between Revenue Grid and Salesforce, generate your tenant URL and authorization credentials.
-
Generate your Revenue Grid tenant URL.
-
Generate the Client ID and Client Secret for the Revenue Grid–Salesforce integration.
See, Generate Client ID and Client Secret for Revenue Grid and Salesforce integrations.
Important
The Client Secret is displayed only once—immediately after the integration is created. Copy and store it securely, as it cannot be viewed again later.
Edit the Revenue Grid named credentials
- Open the Salesforce Setup page.
- In the Quick Search field, enter Named Credentials and select Named Credentials from the search results.
-
Find Revenue Grid Named Credentials in the list and, in the Actions menu next to it, click Edit.

-
Replace the URL with the value of your RevenueGridTenantURL, and click Save.

-
Open Revenue Grid External Credentials.

-
Under the Principals section, click Edit next to the REVGRDPrincipal.

-
In the Edit Principal dialogue, click the Add button two times to add two parameters.

Use exact casing for parameter names
Enter the parameter names exactly as shown:
client_secretandclient_id. These values are case-sensitive—do not change the casing in any way. Any variation will cause authentication in Revenue Grid to fail. -
For the first parameter:
- In the Name field, enter
client_secret. - In the Value field, enter the value of the client secret.
- In the Name field, enter
-
For the second parameter:
- In the Name field, enter
client_id. -
In the Value field, enter the value of the client ID.

- In the Name field, enter
-
Click Save.
Create a permission set
- In the Quick Search field, enter Permission Sets and select Permission Sets from the search results.
-
Click New.

-
In the Label field, enter a name for the permission set (for example, Revenue Grid access).

-
Click Save.
-
On the permission set page, click View Summary.

-
Under Permission Set Information, select the Object Permissions tab, then click Edit.

-
Scroll to the User External Credential object. In the Read column, click the edit icon ().

-
Select the checkbox that appears, then click outside the field to exit edit mode.

-
Click Save.

-
Back to the page of the created permission set and under Apps, open External Credential Principal Access.

-
Click Edit.

-
In the Available External Credential Principals list, select RG_Ext_Creds - RVGRDPrincipal (A), and click Add (B).

-
Click Save.
Assign the permission set to users
-
Return to the Permission Sets page and open created permission set.

-
Click Manage Assignments.

-
Click Add Assignment.

-
Select the users to assign the permission set to, then click Next.

-
Click Assign.

-
When the assignments are complete, click Done.

Next steps
If you’re upgrading from version 1.83 or earlier to version 1.87 or later of the Revenue Grid managed package, make sure your users are fully transitioned to the updated experience. Use the following guides to:
- Switch to the new Revenue Grid app in Salesforce
- Replace Revenue Grid tabs in Lightning app navigation
- Update layouts by replacing old widgets with the new Lightning components